Spring is coming and with it are all the wonderful theme options for preschool! While we don’t live on a farm, I know a lot of exciting things happen on a farm in spring. I also know that little kids love farm animals. That’s why I decided it would be the perfect theme to start us on our preschool journey at home (“fun school” as we’re calling it). With a little help from my friend Pinterest, I put together these hands-on, engaging farm theme preschool ideas and activities. And let me tell you, we had a great week “on the farm”!
Click on any topic below to jump to that section.
- On The Farm MOOvement Cards
- Old MacDonald Had A Farm (with puppets)
- Chicken Coop and Eggs Sensory Play
- Farm Animal Crafts
- Baby and Mama Animal Matching Puzzle
- Feed the Animals Sensory Bin
- Farm Theme Books
- Milk the Cow
This post may contain Amazon, or other, affiliate links for products that I personally use and recommend for kids and homeschool learning. This means I will earn a small commission if you purchase through my link, and if you do, we thank you so much! For more information, please read the full Disclaimer and Disclosure.
🎉 Get $20 Off Outschool Classes!

On The Farm Movement Cards
We got our day started by moo-vin’ our bodies with these fun farm movement cards! We galloped like horses, wiggled like pigs in mud, strutted our stuff like a rooster, sat (on our nests) like a hen, and spun ’round and ’round like a windmill! These cards have since become a great source for getting energy out, any time.
Grab a set of these cards from my TpT store!

Old MacDonald Had A Farm (with puppets)
To start each day, we sang Old MacDonald Had a Farm. To make it more interactive, we used farm animal puppets I made from animal face clip art that I glued to Popsicle sticks. You can find cute farm animal face clipart on Teachers Pay Teachers (TpT). Here’s a link for a set that’s similar to the faces I used.
Chicken Coop and Eggs Sensory Play
We learned about chickens and eggs (and no eggs were dropped or cracked in the process). It appears I was the one learning about the chickens or the eggs in this picture.
For this sensory activity I used a small, shallow, cardboard box for the chicken coop. I sealed the bottom of them box and cut off the two long flaps on top of the box. I kept the shorter edge flaps on the box. This was to make “doors” we could open and close.
Note: Find an out of the way place to put the box coop so that it doesn’t need to be moved.
Next, I put the box on it’s side and glued a few images of real life chickens and chicks around the outside of the box, to look like there were chickens walking around the coop.
Inside the box, I glued a 8×10 inch photo of a mama hen sitting on a nest of eggs. I glued this picture on the back wall of the box so when we peeked into the box we could see it.
I made a rough nest out of some raffia ribbon/straw and grass and laid the nest just inside the box. Then I put a couple of REAL eggs in the nest. **You do not need to use real eggs**. I wanted to use them because Emily hadn’t really touched a raw egg before and I wanted her to understand the delicacy of it.
Once the chicken coop was set up, I explained how eggs come from chickens, and baby chicks come from eggs. I gave Emily a small handful of oats to “feed” to the chickens and let her take and place eggs in and out of the nest. She was so sweet and careful with the eggs and her fake chickens. She even named them!

Farm Animal Crafts
We did a few farm animal crafts including a cotton ball sheep, hand-print chickens, and a painted rock pig. We also worked on our scissor skills by making a baby letter “e” hatching from an egg to work on our letter of the week (“E”).


Baby and Mama Animal Matching Puzzle
We matched baby farm animals to their mama with this really cute printable puzzle. Emily is still playing with these too and she now plays make believe with them. She picks them up like they are walking and makes them talk to each other; it’s pretty cute.
To keep them sturdy, try these laminating sheets from Amazon. I’ve used them for just about everything. They are easy to use and less expensive than a laminating machine, if you don’t laminate much.

Feed the Animals Sensory Bin
This was one of Emily’s favorite activities of the week! We fed corn kernels to barn animals using this great sensory bin idea I fell in love with. Aside from being adorable, it helps with counting practice and fine motor skills. To get the grains into the animals mouths we used a scoop from this set of Helping Hands Sensory Scoops. I highly suggest laminating the animal faces and cards to keep them protected and sturdy! These easy to use laminating sheets are self adhesive and don’t require a laminating machine.
Did you know? Corn kernels are very soothing to run your hands through! I myself enjoyed having my hands buried in this one. As usual, Emily enjoyed it barefoot too.

Farm Theme Books
We read a few books about life on the farm but these two Emily especially enjoyed:
The book Cock-a-doodle-Poo is a hilarious book about a very talented rooster.
The book On the Farm Shine-A-Light is very interactive for kids. They use a flashlight to shine behind the pages of the book to see what really goes on, on the farm.
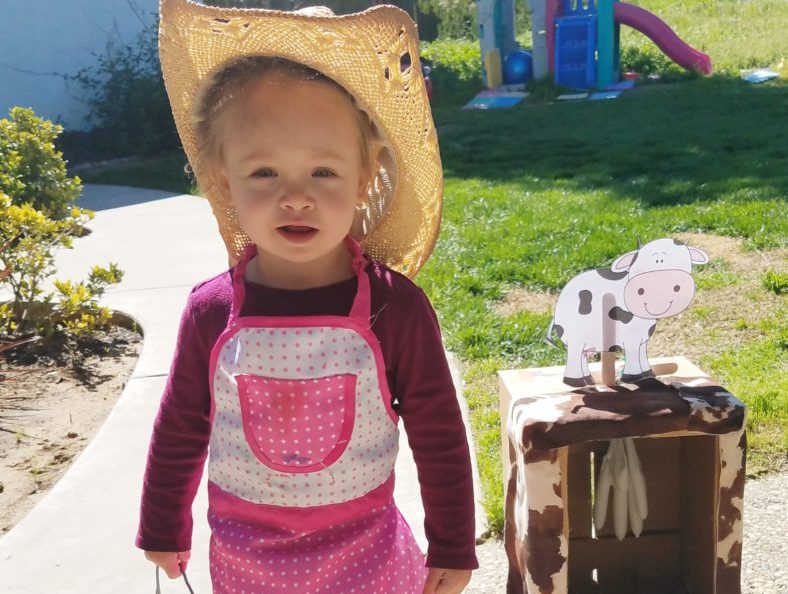
How to Milk A Cow Sensory Activity
Last but not least, this was the hit of the week! When you have your farm theme, you need to include this.
Emily spent hours Milking “Betsy” the Cow (another awesome idea I found on Pinterest – thank you whoever thought of it)! And I spent the hours laughing hysterically, taking pictures and trying to stay out of her way!
Note: This is a fun but MESSY activity, but it’s 100% worth it! It’s best to do it somewhere that’s easy to clean up.
Supplies Needed:
- Medium size, rectangular cardboard box
- Packing Tape
- Cow Image or Clip Art
- LARGE craft (popsicle) sticks
- Hot glue gun/sticks (or some other quick dry, heavy duty glue)
- Rubber glove – this will be the cow udders (use a white, clear, or black glove)
- Milk and water
- Rubber band
- String, zip ties, and/or bread ties (these are needed to secure the glove to the top of the box – you might need a variety of all items)
- Sharp needle
- Old cloth rag or paper towels
- Container or small bucket to catch the “milk”
Here’s how I made our milk cow:
I took a medium sized rectangular cardboard box and sealed all of the sides with packing tape, then cut out a large window on one long side of the box, about an inch in from the edges. I covered the outside of the box with some cow print fabric I had (just to give it that authentic feel, LOL).
I printed clipart of a cow online, cut it out and attached to a large craft (popsicle) stick. Here’s some clip art from TpT with a cute cow image >> Farm Animal Clip Art
Next, I took two more large Popsicle sticks and glued them to each other in a capital “T” pattern using a lot of hot glue (the “T” is what I used to hang the rubber glove “udder”).
I filled a latex free, rubber glove with about 1 1/2 cups part milk / part water mixture and used a rubber band to tightly secure the top of the glove. Note: the liquid did leak out when I laid the glove down so instead I placed it in a small metal bucket with the top upright to prevent leaking.
I cut a small 1 inch slit in one short side of the box (this will be the top). I inserted the body of the “T” Popsicle stick down into the slit, so that the cross top of the T stayed outside of the box.
These few steps get a little messy. I laid the box on it’s back with the open side facing up, then took the rubber glove and tied the top (rubber band part) of it to the Popsicle stick using thick string (I tied it as tight as I could. Thinking back, small zip ties would work great too).
Next I tied two bread ties together (zip ties would be better here too), then wrapped the middle of that around where I attached the rubber glove. Then pushed the ends of the bread tie up through the slit in the box and tied them together around each side of the cross part of the “T” Popsicle stick.
After the glove was attached, I stood the box upright and, using a sharp needle, I poked a few small holes in each of the fingers of the glove (until a little of the liquid started to drip out). I laid a small towel down inside the bottom of the box and put our small pail on top of the towel (to catch the “milk”).
Last, I inserted the other popsicle stick with our cow (Betsy) on it about an inch into the slit on top of the box and secured it to the other popsicle stick with a little bit of tape. We were then ready to milk Betsy!
I had to show Emily how to squeeze each udder at first but once she figured out how to do it she thought it was great. Of course she ended up barefoot for this one too. She had so much fun squirting milk into the pail, but also onto her feet, onto her apron, into her mouth, and at the cat and the dog.


YEE HAW, what a ride that week was. I hope these ideas and activities help make learning fun “on the farm” for you and your little one too!
Don’t forget to check out our other fun school preschool themes!