I love homeschooling preschool. And I love spring. I also love themes. Put them all together here and you will find some fun, hands on, engaging preschool spring theme activities! Plus a few free printables, yay! Happy Spring.
When you’re done saving the spring activities and ideas on this page (oh, and grabbing your FREE stuff), be sure to check out our other preschool themes! Believe me when I say the activities are much easier to do than the photo shoots. You’ll see what I mean as you keep reading.
This post may contain Amazon, or other, affiliate links for products that I personally use and recommend for kids and homeschool learning. This means I will earn a small commission if you purchase through my link – and if you do, we thank you so much! For more information, please read the full Disclaimer and Disclosure.
🎉 Get $20 Off Outschool Classes!

Preschool Spring Theme Sensory Bins
Bug Hunt Sensory Bin
Preschoolers love playing hide and seek and this sensory bin is perfect for that. You will be hiding bugs (fake ones of course) and having them seek them out!
All you need is a large sensory bin (this is a great sensory bin with a lid from Amazon), a few bags of corn kernels, some plastic Easter grass, a set of fake bugs, and some learning tweezers. We use this set of mini toy bugs from Amazon. We also frequently use and love this Fine Motor Tools Set by Learning Resources also from Amazon. I love it because it’s designed for little hands and includes tweezers, droppers for water, and a variety of other grabber things.
To work on those motor skills, have them use the tweezers to pick the bugs out. Put the bugs in a plastic container that can be their “cage”. The first time we did this sensory bin I didn’t have any realistic toy bugs on hand so I made some ants, caterpillars and lady bugs from printed and laminated clipart. They were a little hard to pick up with the tweezers and scoops (or our hands for that matter). So definitely use realistic plastic bugs for this activity!

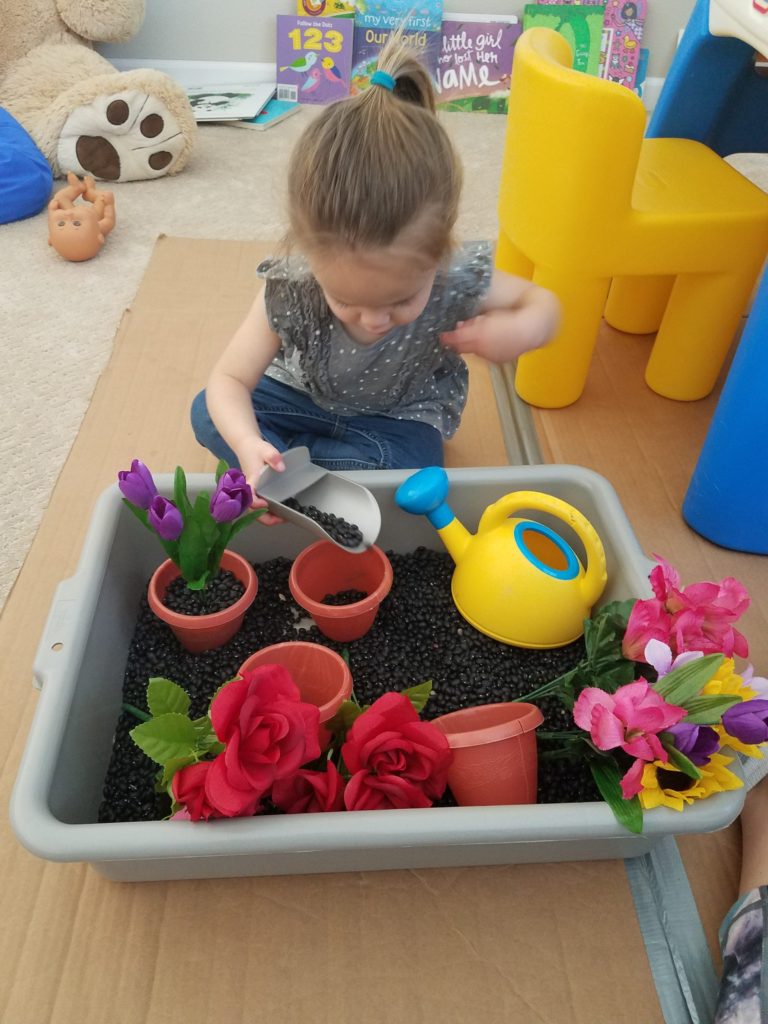
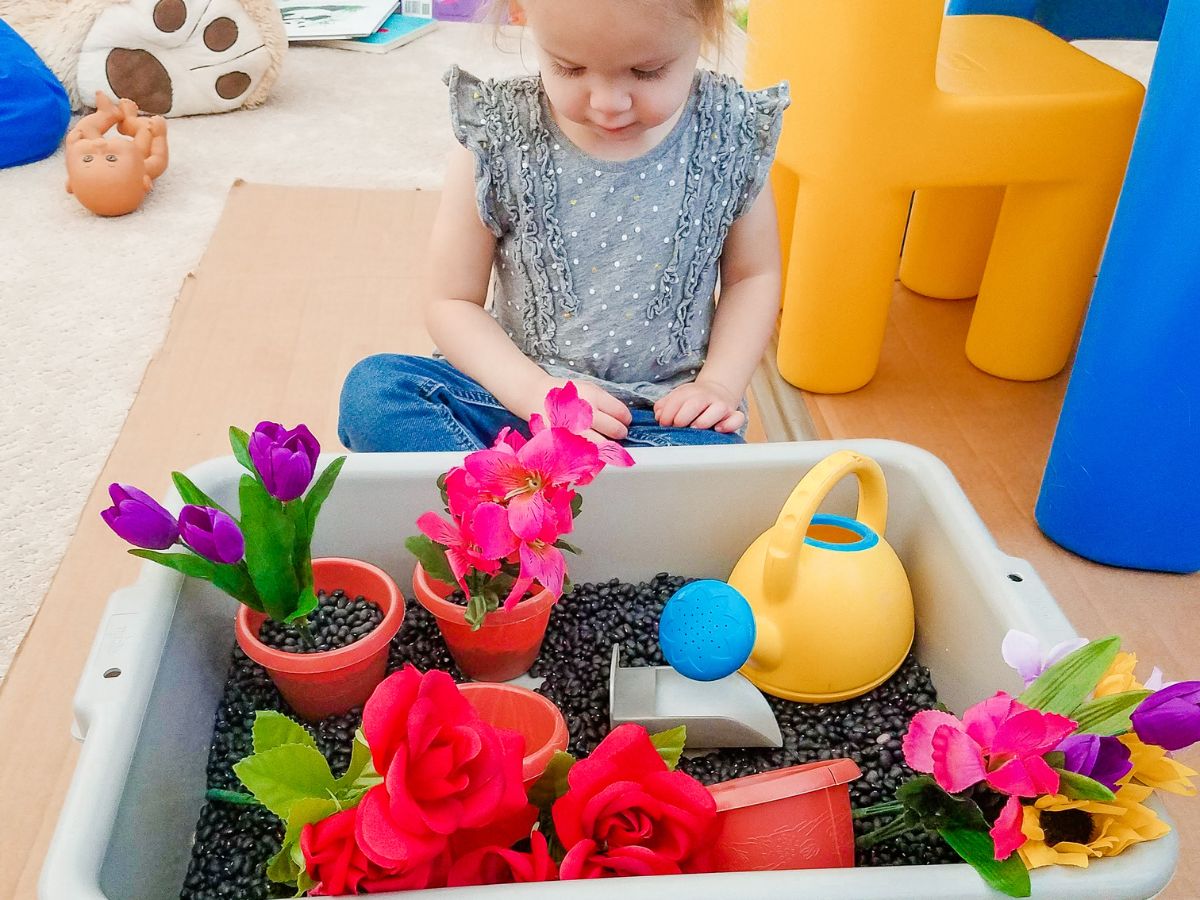
Sensory Bin – Potting Flowers
We also took some time to smell the flowers! We are a big fan of sensory bins. For this one, Emily planted her own “flowers” in a gardening sensory bin I made using black beans as “dirt”. I then added some small plant pots and silk flowers from The Dollar Tree store. I cut the stems of the flowers down to sizes that would fit in the pots and then taped groups of them together using floral tape.
If you’re loving the adorable watering can in the photos, it came from this mini watering can and gardening set from Amazon.

Preschool Spring Theme Math Activities
Ladybug Number Matching and Counting
Emily actually did great at this and I wasn’t sure how her attention span would be. This adorable Ladybug Counting Mat is perfect for number recognition and motor skills! Emily liked this mat a lot and used it multiple times after this.

If you will be using it with one child, printing it on medium or heavy weight card stock will be fine. If you will be using it with multiple kiddos, I recommend laminating the mat and the number pieces. If you don’t have a laminating machine, these self adhesive “fancy” peel and stick lamination sheets from Amazon work great.

Flower Pot Color Matching
This is the cutest activity for preschoolers! This color matching game is from the website ABCs to ACTs and you can get your own set for FREE. It brought out Emily’s imagination and creativity as after she matched the right colors she started to mix them up and design her own arrangement. I laminated these because of the skinny flower stems and knew they were going to get shoved around. Get your copy HERE – Spring Flower Color Matching – ABCs to ACTs.

Flowers and Bees Shape Matching
Emily had so much fun matching shapes with our fun dinosaur shape mats during dino theme week, so of course I wanted to include another activity like that for spring! These shape mats help with shape recognition, fine motor skills, and are great for independent play. Each mat contains bright, colorful flowers with different shapes in the center of each one. And each shape has a bee friend in the same shape to be matched up!
There are two options for this activity too – you can make a long 4-page layout with large flowers (3 to a page) or a 2-page layout with smaller flowers (6 to a page). I like the longer layout because it encourages kiddos to move around to match up the shapes. You can get these shape activity mats from my TpT store!


Preschool Spring Theme Arts and Crafts
Flower Garden and Build-A-Bug Name Crafts
All themed learning needs a name practice activity. These are a ton of fun to make and come out adorable! Both of these hands-on crafts are available in my TpT store!
The flower garden name craft comes with multiple flowers in different colors, shapes, and sizes. As well as different sized flower pots (that were made for short and long names). A black and white version of everything is included too!
The build-a-bug name craft comes with three different bug options to choose from. The legs also have options for printing with and without lines for practicing handwriting letters of the name.


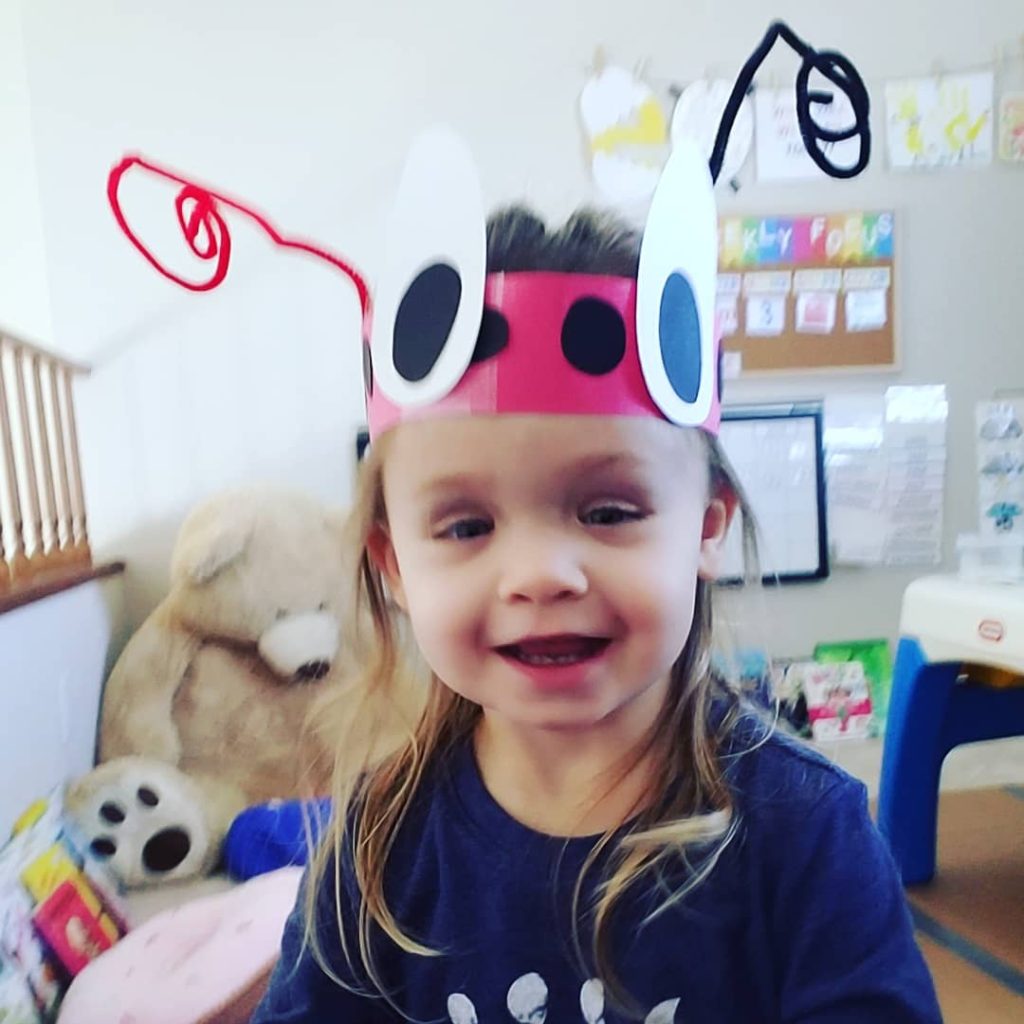
Make Bug Eye Headbands
It just wouldn’t be spring if all the bugs didn’t come out, right? So why not be a bug too! All that is needed for these EASY PEASY headbands is construction paper, scissors, glue, tape, and pipe cleaners.
First, decide what kind of bug you want to be. We chose a lady bug and bee. Cut some thick strips of construction paper (longwise/hot dog length) in the color you choose for your bug. Tape two strips together on one end so you have one long strip.
For the ladybug, I had Emily glue on black circles I cut out of black construction paper. For the bee, I cut small strips of black paper. Glue your details onto the paper strips with a glue stick. GLUE STICKS are great for little hands and gluing things is good fine motor practice too!
Next make the eyeballs. Use a white piece of construction paper and cut out 4 large oval shapes. Then cut 4 smaller ovals out of black construction paper to fit inside the white ovals. Glue the black ovals (pupils) onto the white ovals. Then glue the eyes onto your headband strip. These don’t have to be perfect (or even centered for that matter), the bigger and sillier the better!
Now, measure around your kid’s head (and maybe your own) with the strips and tape the free ends together making a band that fits around their head. Make sure it’s snug enough to not fall off, but not so tight it rips when they push it on…’cause that’s exactly what they will do.
Last, figure out where they want the pipe cleaner antennae’s to go on the headband. You can use multiple colored pipe cleaners too. Curl one end of the pipe cleaner into a swirl, like a snail shell, then tape the opposite end into the head band. Be sure to tape over the very end of the pipe cleaner. The wire in there can poke your littles head and it HURTS.
Add glitter or anything else you want too make it really bug-out. LOL! Then let them BUZZZZZZZZZ around (and they will)!
As you can see the bug-eye headbands were entertaining for us both. And they lasted almost two weeks before our dog, Kallie, found and disassembled them.

Egg Carton Silly Eye Bugs
Finally I was able to get rid of a few of these egg cartons I had been hoarding. Emily loves anything with paint and getting her hands (and those bare feet) dirty, so we’ve done a lot of painting crafts with her over the last couple of years.
First I cut the individual egg cups apart on the cartons.
Then, we painted the outsides (we started with a paintbrush but it was easier to finger paint them all).
Lastly, when they were dry, I inserted pipe cleaners through them to make the legs and then we glued on some googly eyes. NOTE: Use hot glue or regular liquid glue for this!! Glue sticks are not strong enough to stick to the paint and cardboard.
Once these were assembled Emily (and the cat) had a blast playing with them, but then the eyeballs started to fall off.

Preschool Spring Theme Motor Skills
Busy Bug Movement Cards
We got all our wiggles out with these spring theme bug movement cards! Emily LOVES these cards. She so much fun acting out each movement. I even brought these with us on vacation and they were a hit with other people too. I highly recommend them if you have a hyperactive kiddo that needs to keep moving…it’s a great indoor and outdoor activity (and if you do it with them it’s a good workout too). The FREE set of the Busy Bugs Movement cards are available in my Teachers Pay Teachers (TpT) store!

UPDATE: This is an updated IMAGE. Previously there was a link and photo here for the original bug movement cards I was using at the time. That website and item no longer exist. I apologize I can’t give you the cards from the Pinterest image or image that was here before. HOWEVER I am pretty sure you will like my new version! You might even like it better! ❤️ Emily has a ton of fun with them and we even do them as a family. My set of bug movement cards comes with 14 different, silly, bug movements that will get you moving and laughing!

Cheerio Caterpillars
For a fine motor activity, we strung cheerios on a pipe cleaner, attached some googly eyes, then ate those grubs! Well, Emily actually ate a lot of them while they were being made so this activity took a long time, but it did keep her busy stringing the cheerios onto the pipe cleaner.
See also my sad attempt at making a waffle butterfly… yes it does look more like a bat. But when I told Emily it was a butterfly, she believed it was a dang butterfly! Food art is SO fun. Give it a try. Your kids will think it’s awesome. And you’ll feel awesome that it looks WAY better than mine!

Insect Scavenger Hunt
We try to spend as much time outside as possible year-round. But there’s something about the arrival of Spring that really motivates you to get out there. One thing my kid loves to do is hunt for stuff. So what better thing to hunt for on a beautiful sunny day than BUGS?! Ironically, we weren’t super successful at finding any! All of the constant rain then sudden change of weather must’ve had all the winged and leggy creatures still in hiding.
I printed this scavenger hunt sheet from www.mymommystyle.com. It’s FREE, by the way. I laminated it so Emily could use dry erase crayons on it. These dry erase crayons are AMAZING and work on dry erase books/surfaces as well as regular paper. They are WASHABLE and easy to clean off of most surfaces.
We started in our backyard and then moved on to try our hunt at a nearby Regional park, and we still only found a few bugs. But it was fun and a good outdoor activity that we will try again soon. Emily put on a singing “performance” of the song Let It Go from the Disney movie Frozen, for a family who was also at the park though so that was entertaining.

Preschool Spring Theme Science
We learned that bees make honey…mmmmmmm.
Of course you can’t have a preschool spring theme without a major important part of spring…BEES! Since Emily loves honey, I knew this was going to get her attention.
I put this little bee/honey visual together by laminating a set of bees and hive clipart. Then I used tape and pipe cleaners to attach them to flowers I had in a vase. The hive I taped to the outside of a Mason jar and put a little honey in the jar. We moved the bees from the flowers to the hive and back Then we moved the bees from the hive to the flowers and back, then had a taste of honey (my, did I mention my kid loves honey?). Emily even got a bee stamp at the Library that day from the story-time teacher. Annnnd…. back to the photo shoot.
Make sure to grab the flowers and bees shape matching activity mats to pair up with learning about bees!
Update: the clip art used in these images was from a website that no longer exists. I apologize I can no longer share the link for this set. I can suggest these other sets of bee clip art though. These sets are from two places I often use and love! One is Creative Clips – Bee Buds and the other is Educlips – Save the Bees.


Plant REAL Plants
One fun thing to add to a preschool spring theme is to plant REAL flowers or plants. If you have the space to plant a garden, even a small one in a couple of containers on your porch or patio, do it with your kids! They will love to get their hands in the cool soil, put the seeds in, and you can keep them busy each day by giving them the task of watering! It’s definitely hands-on learning and perfect for homeschool. Plus it’s a fun time to watch and learn the life cycle of a plant
You can get a mini watering can and gardening set like this one from Amazon too. It’s the one we have. The tools are fun and the watering can is small for little hands. It doesn’t get so heavy that they can’t carry it either.
At the ends of our spring theme week, Emily and dad planted herbs for an herb garden we gave to Grammy for her birthday (to go along with her flower card). I had Emily do hand-prints in paint all over this barrel too…it came out so cute! Looks like I forgot to take a picture of that. Dang!

That wraps up our preschool spring theme week. I hope you found some ideas to do with your preschoolers to welcome in SPRING!
Be sure to check out our other Fun preschool themed activities too!
